 |
|
|
|
|
|
|
|
|
|
|
|
|
|
|
|
|
|
|
|
|
|
|
|
|
|
|
|
|
|
|
|
|
|
|
|
|
|
|
|
|
|
|
|
|
|
|
|
|
|
|
|
|
|
|
|
|
|
|
|
|
|
|
|
|
|
|
|
|
|
|
|
 |
|
|
|
|
 |
|
|
|
DESIGNED - MANUFACTURED
ASSEMBLED & PACKAGED
IN THE U.S.A.
|
|
|
|
|
|
 |
|
|
|
|
|
|
the One and Only
Genuine...
|
|
|
|
|
|
|
|
|
|
|
|
|
|
|
|
|
|
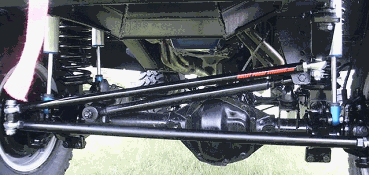
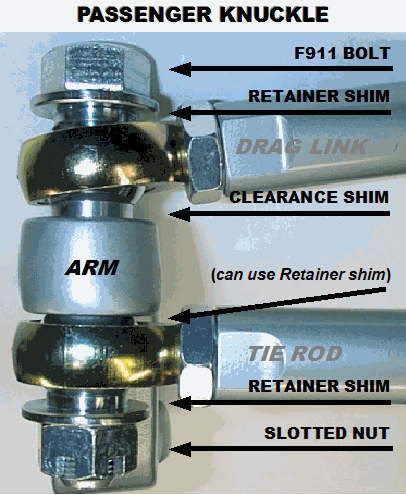
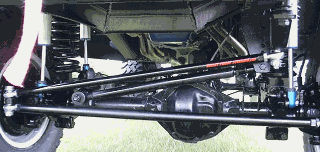
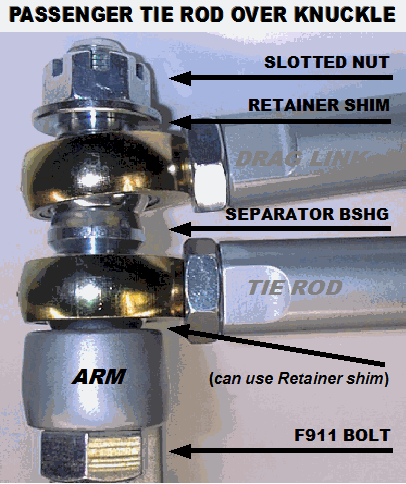
- STEERING & TRACK BAR SYSTEMS -
|
|
|
|
|
|
|
|
|
|

|
|
|
|
|
|
|
|
|
|
Here is a brief preview of the installation procedure to familiarize yourself with this easy to install product. When you receive your kit you will be provided with a very detailed and illustrated manual to follow
|
|
|
|
|
|
|
|
|
|
|
|
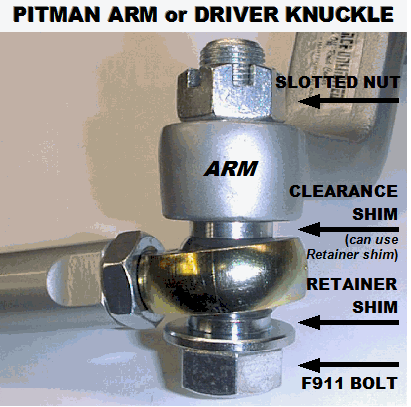
1. Depending on the kit you choose, these are all the tools you may need...
a) Two wrenches, one for the top and bottom of the bolts, and to adjust the rod end jam nuts
b) Hand drill and [1] 3/4" drill bit and [1] 3/32" cobalt drill bit (included in optional installation kit)
c) Abrasive chop saw or hack saw
b) Anti-seize lubricant and Locktite #271 thread locker
2. Remove your existing steering linkage as listed below, depending on what component(s) you are
replacing or installing at that time…
a) Tie Rod
b) Drag link
c) Track Bar
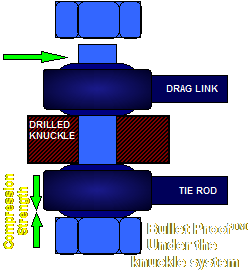
3. You next need to drill out the taper in the knuckle and pitman arm to accept the new, much stronger
straight non-tapered bolt included in the kit. Forged steel knuckles are not hard material, but dense.
A good sharp 3/4" drill bit should take no less than a few minutes per hole to drill. You can easily
drill these holes straight right on the vehicle with a hand drill without removing the knuckles or
pitman are to do so. The pitman arm could be drilled in a drill press if already removed at the time.
(This is further illustrated below)
4. Now you can bolt on the tie rod and/or drag link with one bolt on each end. If you are also installing
a track bar, you can bolt that on at this time as well with one bolt on each end.
5. Take your finished product to the local front end shop for a quick alignment. And YOU'RE DONE!
* * * THAT'S ALL THERE IS TO THIS VERY EASY AND QUICK TO INSTALL KIT!!!!! * * *
|
|
|
|
|
|
|
|
|
|
|
 |
|
|
|
 |
|
|
|
 |
|
|
|
|
|
|
|
|
|
|
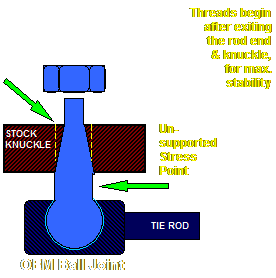
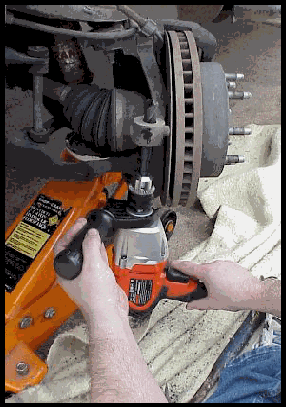
Drilling does not
significantly reduce knuckle strength since in most cases the hole is merely being straightened and minimal material is being removed.
|
|
|
|
|
|
|
|
|
|
|
|
|
|
|
|
|
 |
|
|
|
|
|
|
|
|
|
 |
|
|
|
|
|
|
Drilling the knuckle is as easy as this! The knuckle is made of strong, dense metal but not hardened, so it results in the consistency on the order of "chewing gum." By simply using a hand drill and a 3/4" drill bit (no expensive reamers needed an removing the knuckle and placing it in a drill press is not required!) you can effectively and accurately drill the knuckle in just a few minutes. Using oil and a slow rotating drill will make this simple job even easier. In most cases you will not even be removing any appreciable material, but rather merely just "straightening" out the existing hole with only cutting into the taper on one side of the hole in the knuckle.
|
|
|
|
|
|
|
|
|
 |
|
|
|
|
|
Sample of our
Super Detailed Instruction Manual...
|
|
|
|
|
|
|
|
|
 |
|
|
|
|
|
|
 |
|
|
|
|
|
|
|
|
|
 |
|